How To Draw A Kimono
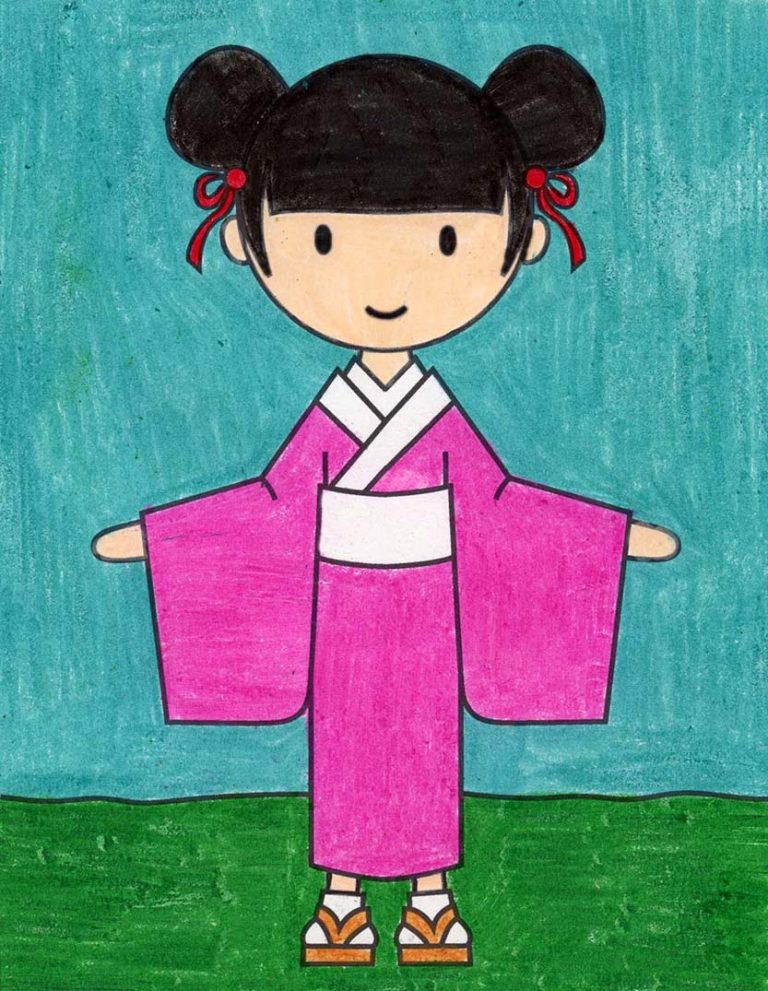
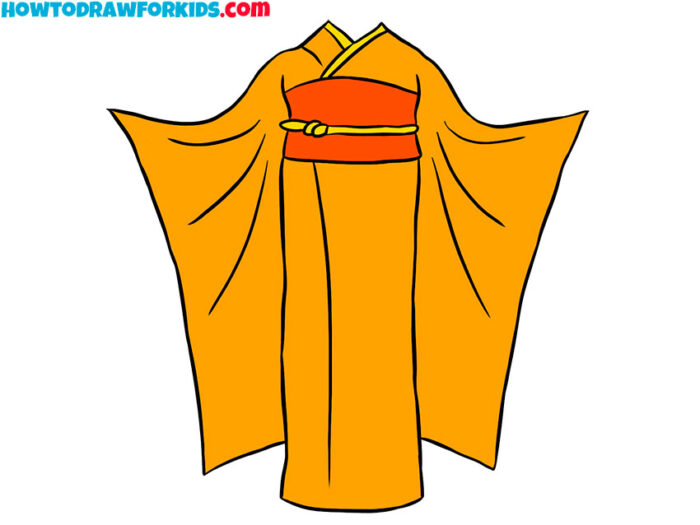
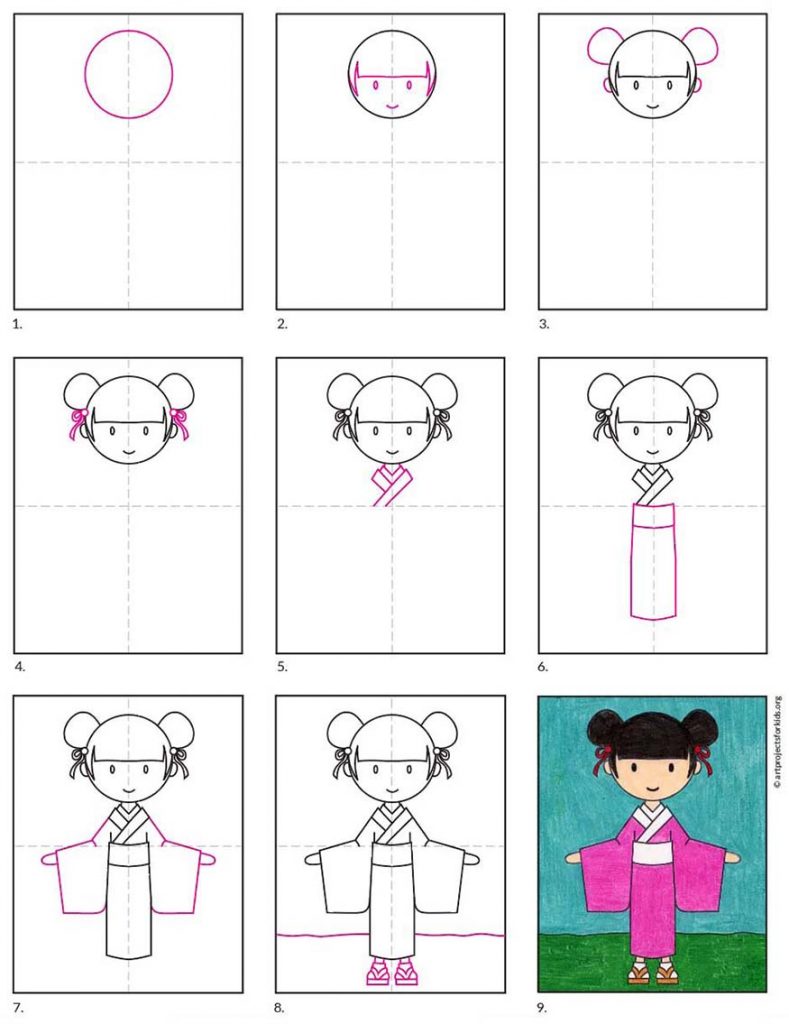
How To Draw A Kimono - Web take ½ inches off length from the back and add it to the front. Move your side dart near your armhole. In this step, we will focus on drawing the collar. In this video, we will show you how to draw a kimono dress step by step with easy drawing tutorial step by. Don’t be afraid to experiment and create your own custom designs. Web drawing a kimono can be an exciting and creative journey for any artist. Sketch an oval shape head. The collar, known as the “eri” in japanese, is an important feature of the kimono. Whether you’re an experienced designer or a complete beginner, it’s sure to put your artistic abilities to the test! Start by extending the lines of the kimono’s neckline upwards to create the collar. We will help you become a drawing expert. To see more about how to draw life poses, please click here. Draw two vertical lines and connect them together at the bottom to make a large rectangle. Ok, it's a quick lesson on how to draw a kimono. These will serve as guidelines for the collar and hem of the. Draw a circle for the head. Many japanese patterns have a clear outline. Web bring the short sides of the neck right to right together, pin, and sew 1 cm from the edge. For a kimono sleeve, you need a long shoulder seam. The collar, known as the “eri” in japanese, is an important feature of the kimono. Add a curly line to draw the collar and shoulders. Web are you ready to embark on a journey to japan and learn how to draw and paint a beautiful kimono? Draw the collar and robe edges. Draw a circle for the head. Ok, it's a quick lesson on how to draw a kimono. The first half covers the differences between kimonos and yukatas, as well as the basic elements of a yukata. Begin with a vertical line down the center of your paper, as this will act as the spine of the garment. Draw the bodice, and make sure you draw it with space for the sleeves. The second half explains how to. Add a v shape at the top of the t to create the neckline. Begin with a vertical line down the center of your paper, as this will act as the spine of the garment. Extend the vertical line of the t shape to form the length of the garment. We will help you become a drawing expert. Web if. Draw ears and two hair buns. Web are you ready to embark on a journey to japan and learn how to draw and paint a beautiful kimono? Draw the collar and robe edges. Web drawing a kimono can be an exciting and creative journey for any artist. It adds structure and elegance to the garment. Include vertical lines inside the sleeves and at the bottom of. Web begin by drawing a simple t shape for the body and sleeves of the kimono. To see more about how to draw life poses, please click here. Now you know the basics of drawing kimonos, it’s time to practice. Published & bind in japan. Add the obi and the robe shape below. Don’t be afraid to experiment and create your own custom designs. To see more about how to draw life poses, please click here. Web hi everyone, !welcome to moshley drawing channel. Draw the collar and robe edges. As a japanese company, we thought it would be fun to show off this little visual reference by manga artist chihiro howe that helps you easily see how various. Then, draw two horizontal lines intersecting the vertical line near the top and bottom. Don’t be afraid to experiment and create your own custom designs. Add a curly line to draw. Web take ½ inches off length from the back and add it to the front. To see more about how to draw life poses, please click here. As a japanese company, we thought it would be fun to show off this little visual reference by manga artist chihiro howe that helps you easily see how various. The collar, known as. Add the obi and the robe shape below. There are several types of kimono. To see more about how to draw life poses, please click here. Draw two vertical lines and connect them together at the bottom to make a large rectangle. Move your side dart near your armhole. Web hi everyone, !welcome to moshley drawing channel. First, place a new layer on top of the draft layer. Start by extending the lines of the kimono’s neckline upwards to create the collar. Web if you have time, you can also experiment with shading techniques to make the drawing look more realistic. Draw the obi sash by sketching a rectangle. These will serve as guidelines for the collar and hem of the. This tutorial is perfect for children a. Web draw the top. The second half explains how to draw yukatas, and with simple explanations of how to use ratios and guides to make drawing yukatas easier. Whether you’re an experienced designer or a complete beginner, it’s sure to put your artistic abilities to the test! Draw two vertical lines and connect them together at the bottom to make a large rectangle. In this video, we'll guide you through every step of the wa. Draw the bodice, and make sure you draw it with space for the sleeves. Web take ½ inches off length from the back and add it to the front. Add some bows below the buns. Add a curly line to draw the collar and shoulders. The collar, known as the “eri” in japanese, is an important feature of the kimono. The first half covers the differences between kimonos and yukatas, as well as the basic elements of a yukata. Now it’s time to draw in the pattern. Start by extending the lines of the kimono’s neckline upwards to create the collar. Published & bind in japan.
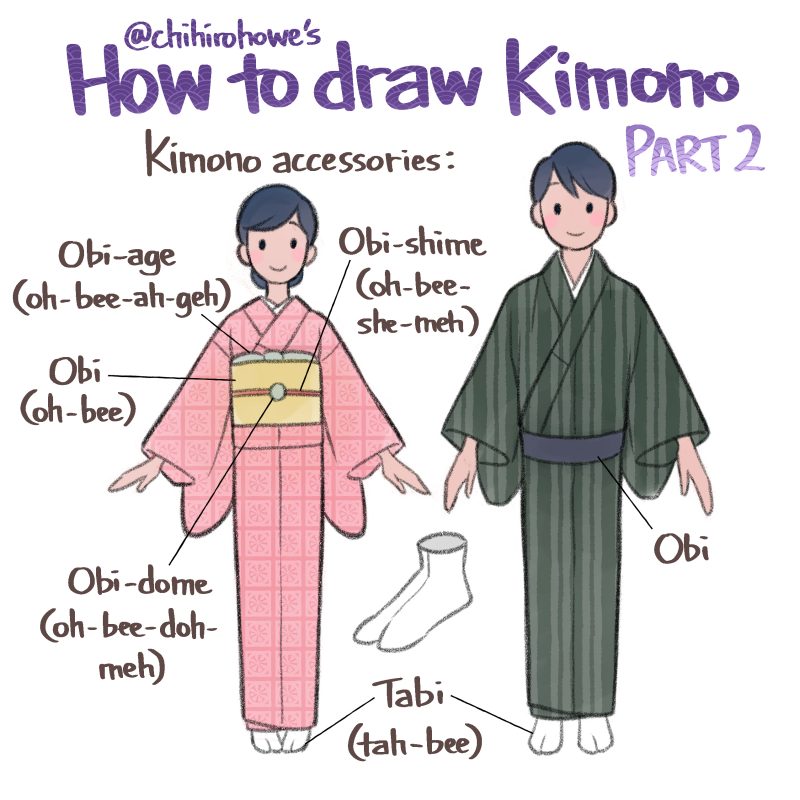
Chihiro Howe Takogawa’s Instagram profile post “Part 10 and 11 of How
Japanese Kimono Drawing
How to Draw a Kimono · Art Projects for Kids

Gefällt 9,822 Mal, 56 Kommentare ハウ千尋 (chihirohowe) auf Instagram

how to draw kimono part 2 with instructions for beginners and advanced

how to draw a kimono step by step in 2023 Drawing clothes, Drawing

how to draw proper kimono by saTen0w0 on DeviantArt
How to Draw a Kimono Easy Drawing Tutorial For Kids
How to Draw a Kimono · Art Projects for Kids
How To Draw Traditional Japanese Clothing Blog
In Case You Do Not Already Have A Bust Pattern, Here’s How You Should Start.
Extend The Vertical Line Of The T Shape To Form The Length Of The Garment.
Take Out Your Pencils And Color Pens ^^Let's Draw Togethe.
Add A V Shape At The Top Of The T To Create The Neckline.
Related Post: